Automated python testing on Github
Setup your own CI(continuous integration) workflow on Github


To beging with, let us go through some basic definition of what Continuous Integration is and what we want to achieve with the tools that are available.
What is CI(continuous integration)?
While there are plenty of excellent resources online to read about whta CI is and what are its advantages. Continuous Integration (CI) in its simplest interpretation is a development practice where developers integrate their work (code) into a shared repository frequently, preferably several times a day. With each integration being verified by an automated build and tests.
One of the key benefits of integrating regularly is that errors can be easily detected and located. CI has become a best practice for software development and is guided by a set of key principles. Among them are revision control, build automation and automated testing.
“Continuous Integration doesn’t get rid of bugs, but it does make them dramatically easier to find and remove.” -Martin Fowler, Chief Scientist, ThoughtWorks
Sounds good, how to proceed next?
Well, their are multiple solutions/ways in which one can setup CI. Perhaps you have heard of jenkins, which "is a free and open source automation server that helps automate the parts of software development related to building, testing, and deploying, facilitating continuous integration and continuous delivery".
But, Github also offers the necessary tools required to achieve what jenkins perhaps (not from experience) makes it easy since it has been specifically developed for automation. Github enables setting up workflows which can in turn be used create custom continuous integration (CI) and continuous deployment (CD) workflows directly in one's GitHub repository with GitHub Actions.
In this post we will be mainly looking at how to make use of Github actions to setup a Continuous integrations workflow where tests are performed upon each pull request and the test statistics are displayed right at the pull request which would help both the integrator and the code contributor to identify and rectify errors easily before the work can be merged into the main or development branch.
Python testing framework
Pytest is a python testing framework that we will be using. The pytest framework makes it easy to write small tests, yet scales to support complex functional testing for applications and libraries.
An example of simple test:
def inc(x):
    return x + 1


def test_answer():
    assert inc(3) == 5
Pytest has neat feature using which all files of the form test_*.py or *_test.py in the current directory and its subdirectories can be run automatically. The results of the test can then be summarised into an xml file which can be read by an automated process to further generate easily interpretable graphs/graphics.
Generating graphs/graphics
In the previous section we got to know about the testing framework which can run the tests on demand and also summarises the results into an xml which can be used by automated processes to generate easily interpretable graphs/graphics.
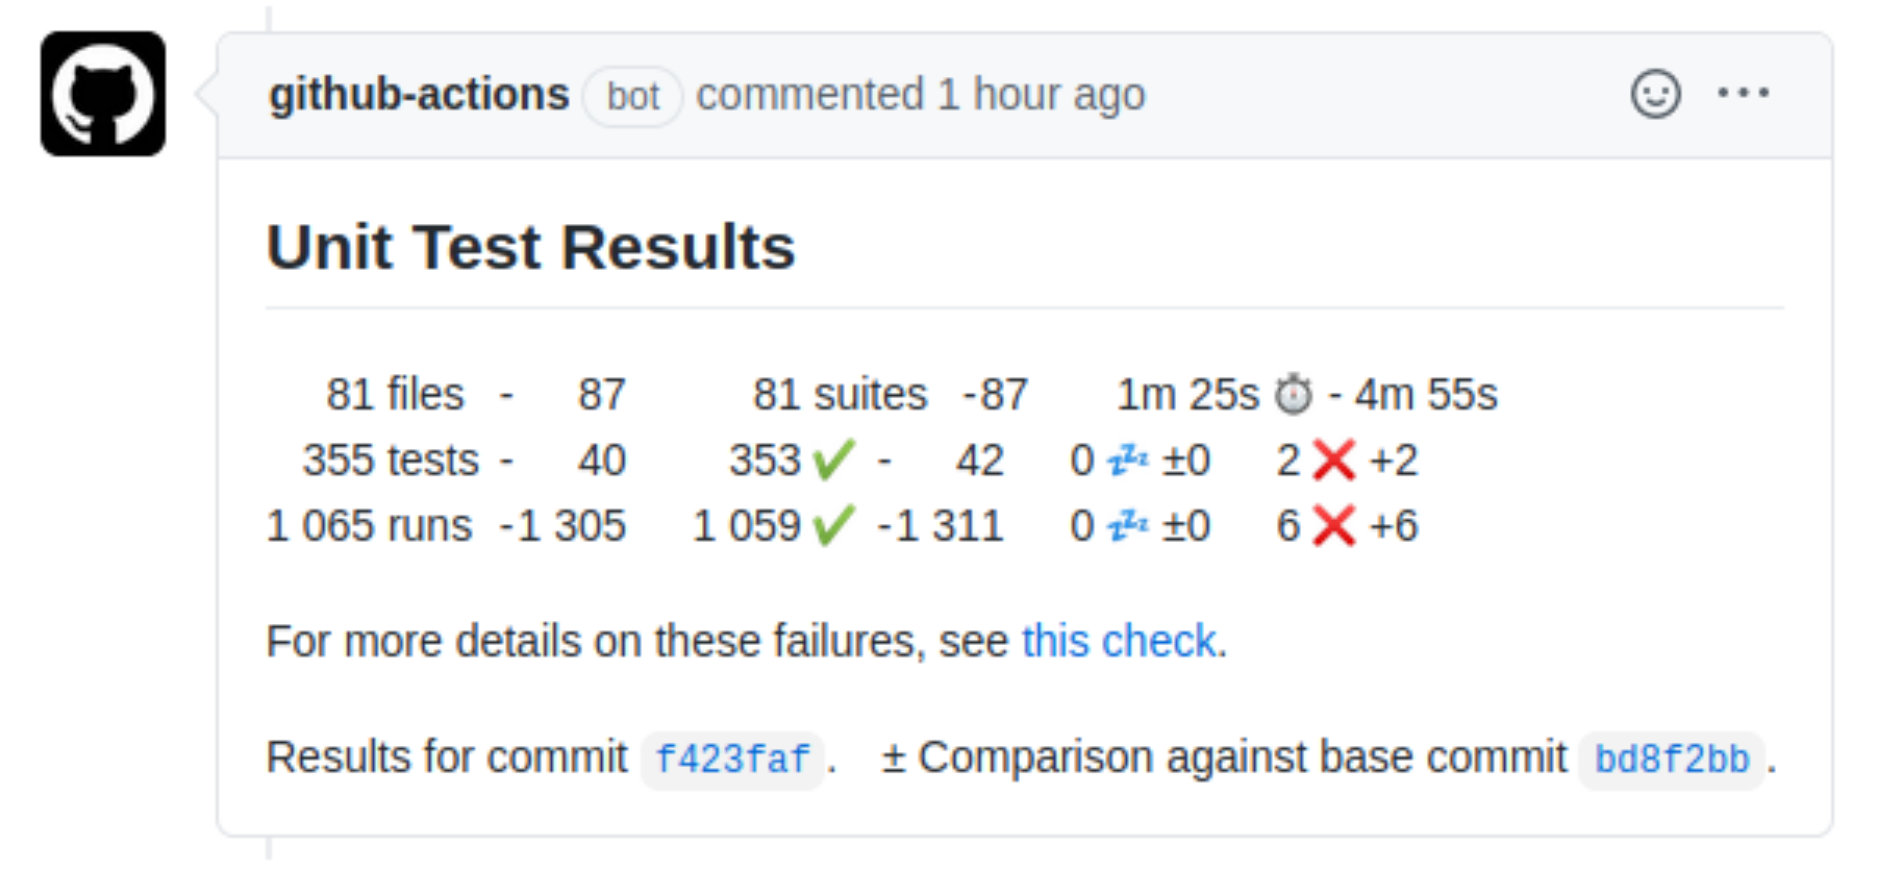
For this purpose we will make use of an Github-action made by Enrico Minack which analyses Unit Test result files(xml) and publishes the results on GitHub. It supports the JUnit XML file format. Here is an example of a comment posted on the pull request of the commit that triggers the workflow, if one exists. In presence of failures or errors, the comment links to the respective check page with failure details:
Setting up Github action for Python testing
If the reader is not familar with what Github actions are, I highly recommend spending some time to read through the following introduction website which explains introduces Github actions clearly and concisely.
By default the github actions are meant to be stored inside a .github/workflows folder as yml files. This is where we will be creating a file named python-testing.yml and define all the relevant details regarding the automated workflow that we want to set up.
yml
# This is a basic workflow to help you get started with Actions

name: Binary-Tree-Python-Testing

# Controls when the action will run.
on:
  # Triggers the workflow on pull request events but only for the devel branch
  pull_request:
    branches: [ devel ]

  # Allows you to run this workflow manually from the Actions tab
  workflow_dispatch:

# A workflow run is made up of one or more jobs that can run sequentially or in parallel
jobs:
  # This workflow contains a single job called "test"
  test:
    # The type of runner that the job will run on
    runs-on: ubuntu-latest

    # Steps represent a sequence of tasks that will be executed as part of the job
    steps:
      # Checks-out your repository under $GITHUB_WORKSPACE, so your job can access it
      - uses: actions/checkout@v2
      # Pick the python version with which you want the tests to be carried out. 'x' allows github to pick the lastest stable version available
      - name: Set up Python
        uses: actions/setup-python@v2
        with:
          python-version: '3.8.x'
      # Install pytest and pytest-cov (code coverage) in the virtual runner to run the tests. pytest also summarises the test results in an xml file which will be used by the action in the next step to generate some graphics and post as comment at the commit/pull request that triggers the automated tesing workflow
      - name: Test with pytest
        run: |
          pip install pytest
          pip install pytest-cov
          pytest --doctest-modules --junitxml=junit/test-results.xml --cov=com --cov-report=xml --cov-report=html
      # Publish the results of testing as a graphical summary in the conversation of the pull request that triggered the action (from the previous section)
      - name: Publish Unit Test Results
        uses: EnricoMi/publish-unit-test-result-action@v1
        if: always()
        with:
          files: junit/test-results.xml
          GITHUB_TOKEN: $
Automated testing in action!!
Now that we have everything set up, we can see the automated testing workflow in action. Since the workflow has been configured to run upon a pull request being made to the devel (development) branch, any pull request that is made to the devel branch triggers the workflow and the results of the testing will be posted.
Since I had started to work on creating a library of binary-tree data structure and the relevant algorithms, I have this workflow setup for my own repository which I have been using to integrate changes and updates to the library I am building. Here is the most recent pull request I myself made to the library that I am working on to emulate an actual development process/environment. In the pull request below, I have added priority queues functionatily along with relevant test cases which test the functionality.
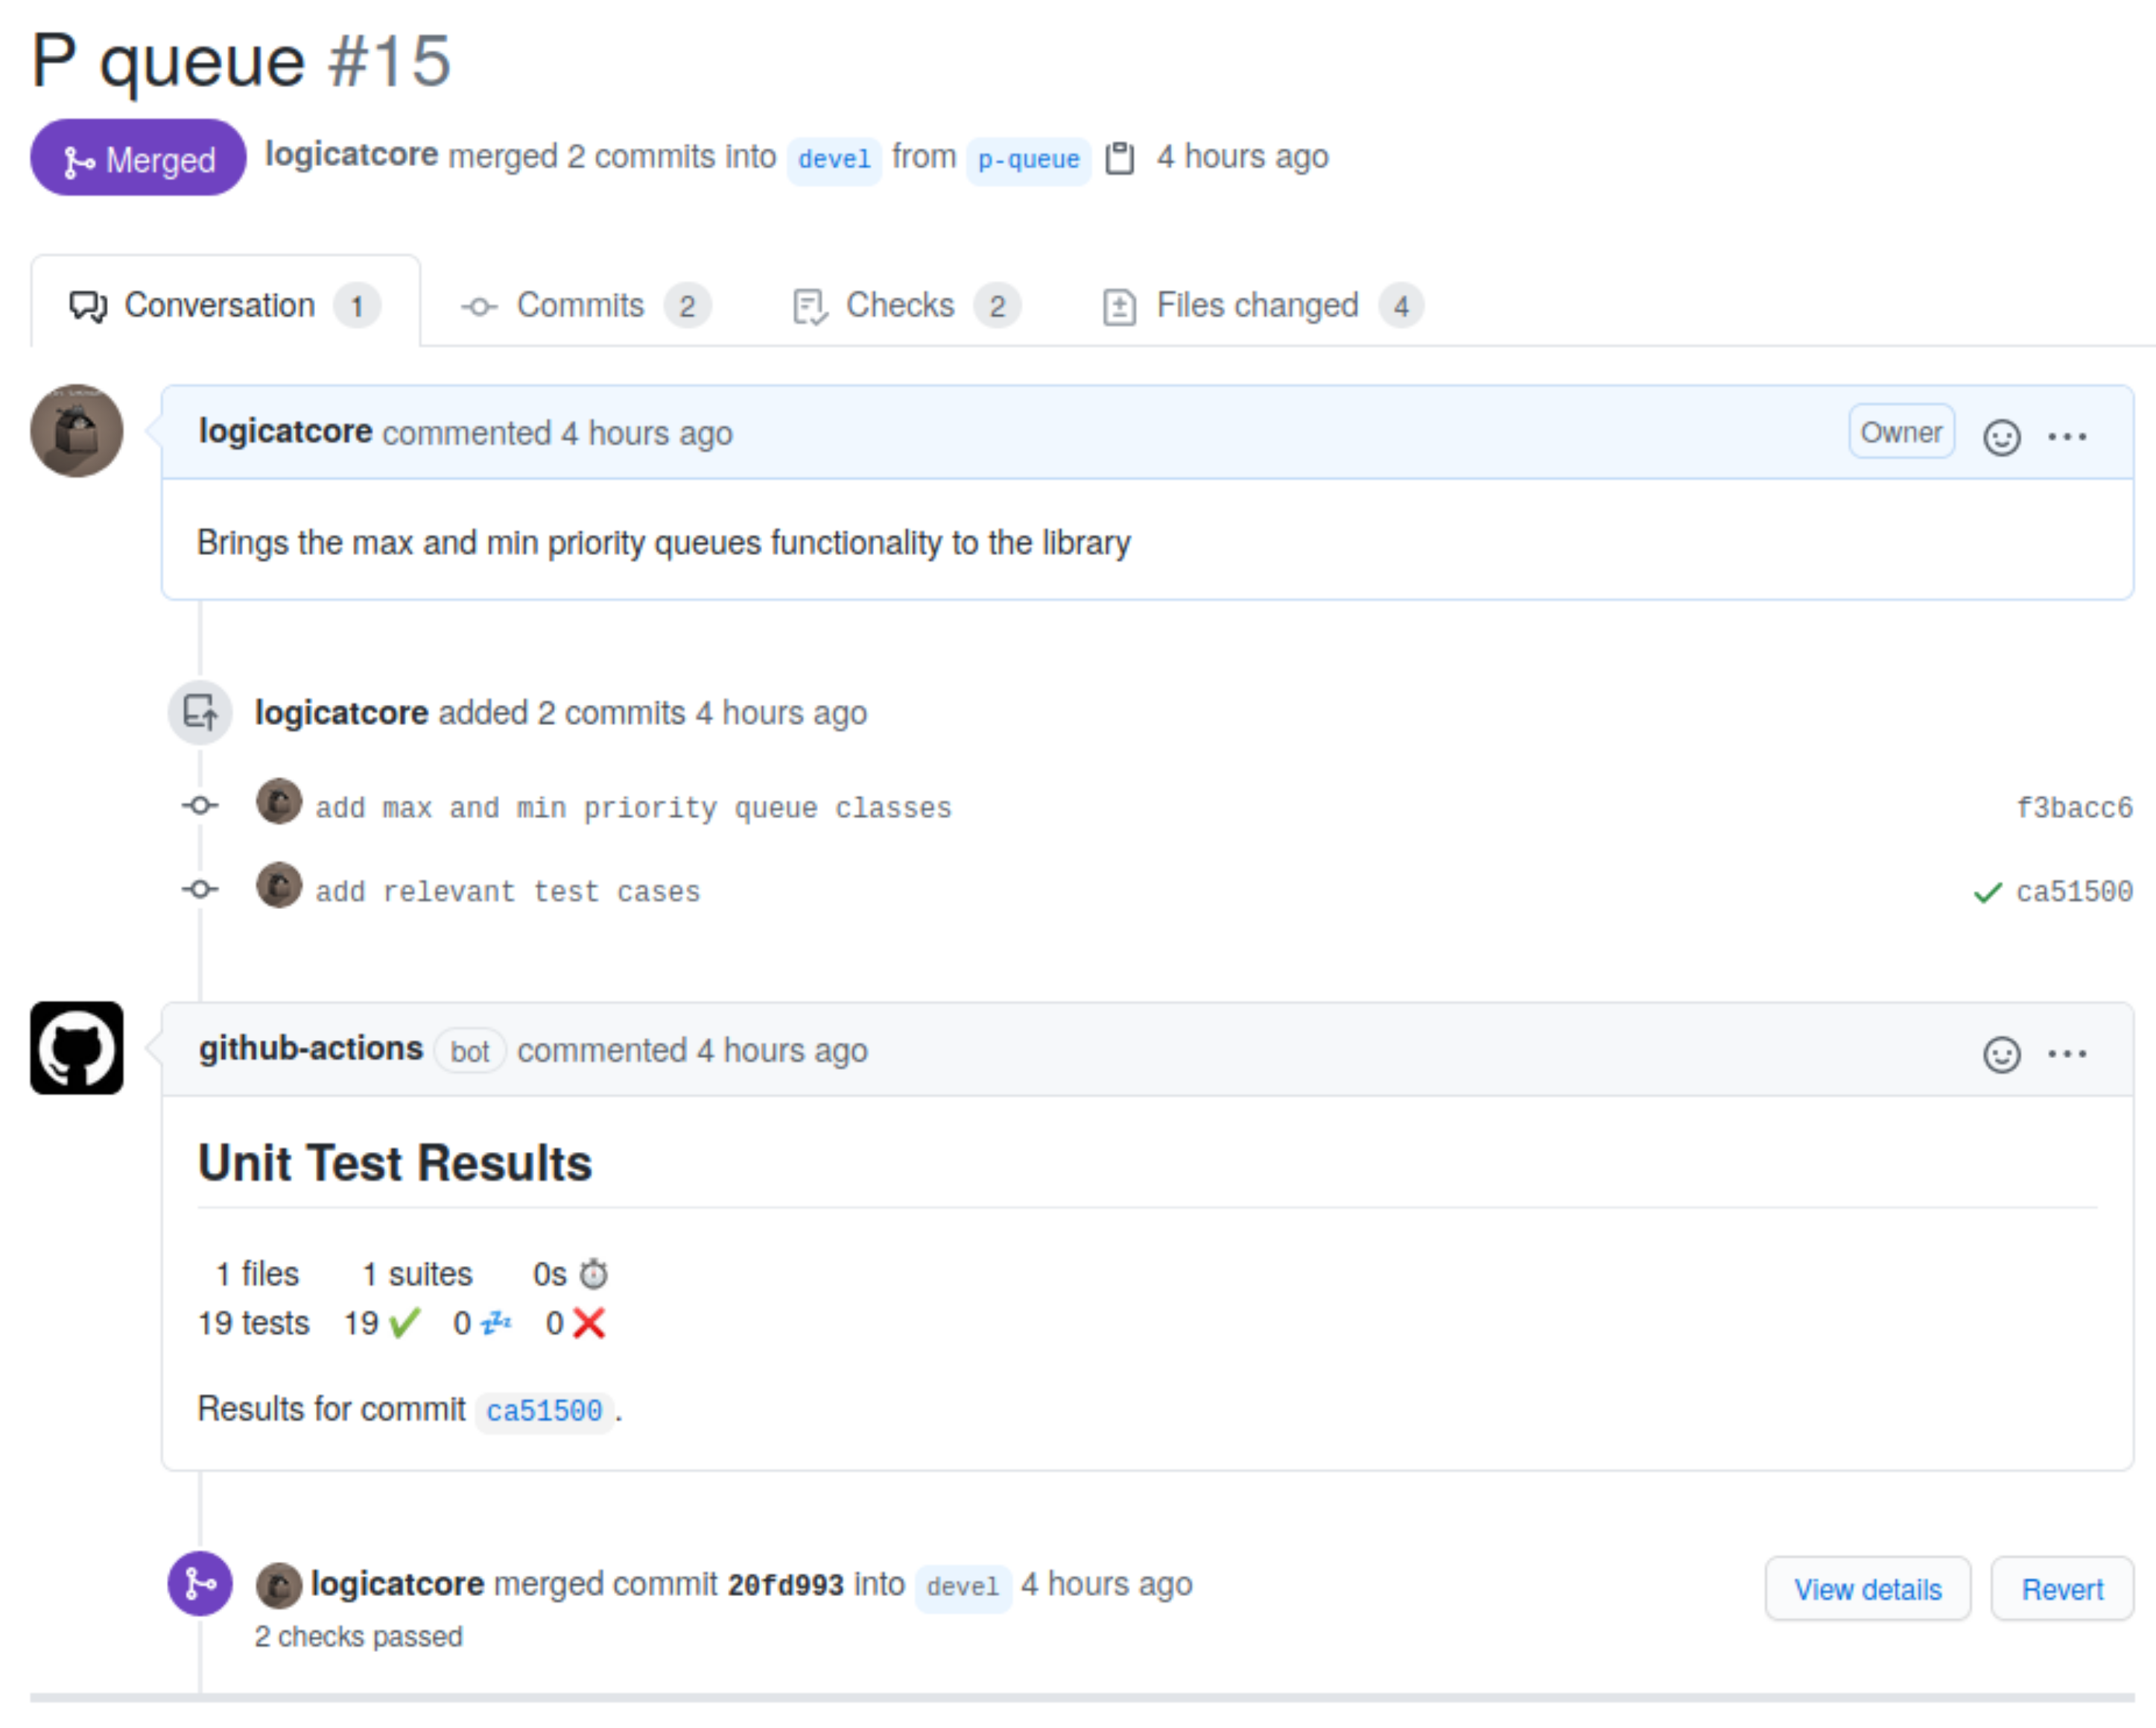
This form of testing enables a form of feeback loop to the developers who can be sure that the new changes do not break the old work and just build upon or expand the functionalities.
If you have any questions or need any help do not hesitate to reach out to me via comments!